Thursday, June 22, 2017

Easy Pillow Cover


I am back as promised with my easy to make pillow cover. Here it is all finished and I promise it's easy to do!


I started with a pillow I found on clearance at Tuesday Morning. It was a great price because the fabric was picked, which was fine by me since I just wanted the pillow form and zipper.


Since my pillow has a cover already, I am using it as my pattern and also removing and reusing the zipper. First, remove the pillow form then using your seam ripper remove the zipper. Now measure the old cover to determine what size fabric pieces you need. Mine measures 17”, so I trimmed my skunk embroidery to size and cut my back piece of fabric. I like to taper the edges of my pillows in a bit so the corners don’t get super pointy. On the open edges, I mark in ½” on the corner then taper it to the edge (about four inches). I marked that line then did the other side, then cut along those lines. I do this to all four corners.


Now iron the zipper. Mine was kind of coiled back, so I carefully ironed getting close to the teeth. If it’s not flat the needled can’t get close enough when you sew and the zipper will show. See how it uncurled as I pressed it.


I then eyeballed laying the zipper in the center of my fabric. Once placed I measured in 2½ inches from the edge and marked this on both the fabric and zipper for front and back pieces. 


To make sewing this zipper extra easy (no pins!) I am going to glue it. I read this tip on Pinterest and I am happy to say it works and it works well! I used a purple glue stick to attach the zipper. Just dab the glue along the edge of the fabric and press the zipper to it lining up the marks. Once adhered I used my iron to really set it. Then I did the same to the other side.


Now it’s time to sew. With the zipper, open and using an invisible zipper foot I stitched as close to the zipper pull as I could get then I did the other side.


Now to finish up the zipper side, mark where the stitching line would continue to the edge. Sew from the edge to about ½” past where your zipper stitches ended. Do the same for the other end. Notice the overlap.


Now open zipper about half way and lay fabric right sides together and stitch the other three sides. For the corners, some people clip and then poke them out I however don’t like this. I have accidentally poked through the fabric this way so instead I fold along one seam then the other making a corner and then flip. 


Crisp corners without worrying about holes!

Now turn and insert the pillow form and zip closed, done! Just look at that invisible zipper! It doesn’t matter what color the zipper is if sewn properly it won’t be seen. Only the pull tab is visible. Also, you can always paint the pull tab with nail polish if you do want a specific color. Isn’t this animal print so cute! I bought it at Joann’s a while back, I think it turned out perfect for my pillow. 

Hope you enjoy my easy pillow cover tutorial! As always comments and questions are always welcome! Check out my previous posting for information on the skunk embroidery by Alyssa Thomas at Penguin and Fish.

Wednesday, June 14, 2017

New Favorite Craft Book

Lately I have been in a hand stitching mood. Not just a wanting to sew anything mood but one of those moods where I want to also be able to finish it quickly kind of moods. I was looking through my patterns and craft books trying to decide on a project when I found my copy of  Alyssa Thomas's book Sew & Stitch Embroidery. 


I had that aha moment that this is what I was looking for! I’ve had this book for a while I just haven’t gotten around to trying any of the patterns yet, now was the time. As you can tell from the cover her designs are absolutely adorable! There are so many different animal patterns I can't get over how much cuteness is packed into this book! Here is the first embroidery I tried, it’s a guinea pig.


I love his little toes! Aside from the designs being super cute they are also quick and easy to stitch out, perfect for a beginner. The instructions are clear and easy to follow so I know you will be sewing in no time. That said I have been sewing for years and still love these patterns because I can actually complete a super cute hand embroidered project in an evening. The book also has instructions for making various home decor items and accessories out of your finished embroideries, which is great because then you can show off your handiwork! Here is the link to her website where you can purchase a copy http://penguinandfish.com/sewandstitchembroidery

Lately this book been my go to for fun and whimsical projects. Just last night I finished this little guy.


It’s going to be a pillow cover. The skunk was from her book and I just added some flowers to fill out my pillow shape.

That’s all for today, hope you enjoy the book review and be sure to check back. Next time I will be doing a tutorial on how I make my pillow cover!


Friday, June 2, 2017

Orange Bird Dress

I am a huge Disney fan! I love all things Disney and that includes Disney attire. A few weeks ago I stumbled upon a this Orange Bird necklace and bracelet set!

Just look at that cute Orange Bird face!!


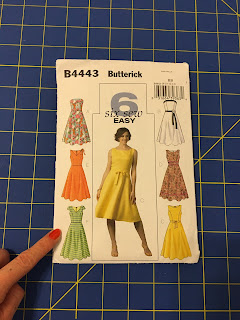
I LOVED it but knew that if I bought it I would have to make a dress to wear with it, so last week I did just that. I made myself an Orange Bird themed dress! I used Butterick pattern B4443, and originally was making style F. I wanted a dress with a vintage flair, but not so extreme that my husband would feel uncomfortable being with me and wearing jeans and a polo shirt. This pattern fit the bill.
I prefer sleeves but when I went to attach them to the bodice they were small and sort of stuck out. Knowing that, I planned on wearing a green sweater with the dress I thought the perky sleeves would just make my sweater look lumpy, so I opted for the sleeveless style in C but with a modified belt. I wanted a wider belt with a perky double bow. Having made bow ties in the past, I was familiar with bow making, so I just guessed about the size I wanted and whipped up a quick belt.
After I finished the dress I made one of my signature felties to adorn the skirt. It just gives it that extra bit of Disney flair! Happy Orange Bird!

Here is the finished dress on my mannequin Helena! Does anyone else name their sewing accessories?

Taadaa!
 And with the sweater for the full effect.
What do you think? Next time I'm wearing it to the Magic Kingdom!